No Sew Wool Fabric Succulents
WonderFil Specialty Threads
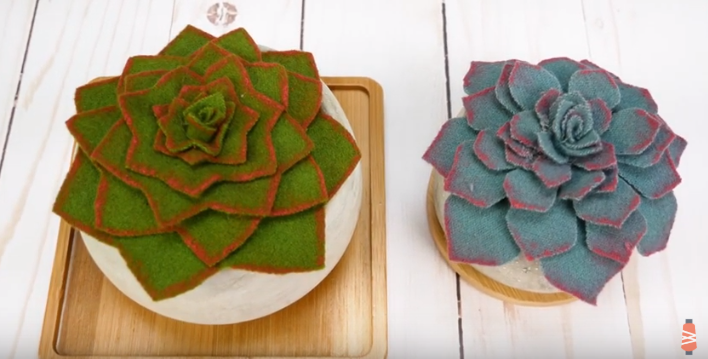
If you are anything like me, keeping plants alive may be a bit of a challenge. Many people turn to fake plants to fill up their space and make it lively. We all know home décor can be pretty pricey, so we are going to show you an inexpensive and crafty way to spice up your space. We are going to be showing you how to make some pretty wool succulents that require no sewing as pictured below:
What you’ll need: Green wool, hot glue/gun, free downloadable pattern, and anything to add depth of color such as paint, crayons, lipstick, eye shadow, etc.
For the wool we recommend using for these succulents is 100% superior grade Australian merino wool, and we are using colors LN17, and LN16. If you want to do the same you can find more information to purchase here

Getting Started: You can download our free pattern right here: https://bit.ly/2UUIGgo and it is pictured below.

Cut out the pattern with paper scissors so you can pin or trace out onto your wool. We decided to pin the paper to the wool, and cut this way.


Once you have them all cut out we began with succulent number one. In order to add a bit of realism we added some lipstick to the outer edges for a pop of color.

Assembly: Take piece 1A and put a little circle of glue in the middle.

Place piece 1B on top of 1A and off set it so that they do not line up. This will give more dimension. We used a marker to push the pieces together, especially since the glue can burn you.

To add some more depth you want to glue the sliver of 1C in order to close the shape, so it will look more like a cone.

Glue 1C on top of your succulent, and repeat with 1D. Making 1D also into a cone by gluing to close the gap and then adding it on top of your succulent. We pushed into the middle with a pen to make sure it is all secured.

Take piece 1F and roll it up- creating a cylinder shape.

Then place glue and then 1F onto the top of your succulent. And it should look something like the picture below.

Succulent 2: To prep and add more dimension again we added lipstick to the outer edges, and eye shadow around the pieces.

Assembly: Take piece 2A and add a circle of glue in the middle. And then take piece 2B and adhere it to the bottom. Making sure it is again off set

Cutting a little x into the middle of pieces 2C, 2D, and 2E will add depth.

On your succulent add another circle of glue in the middle and add piece 2C. Push in the middle of the x , you cut to combine the pieces and also add a little space for the next piece to sink down into (adding depth)

Then continue adding pieces 2D and 2E the same way, pushing the middle in with a pen. Then same with succulent 1 you want to roll 2F and place on the top in the middle to add the finishing touch. It should look something like pictured below.

To style your wool succulents, you could place them on a small pot, or perhaps a tray, and that’s it. You have created some plants that require no care that will brighten up your space! We would love to see how yours turned out as well. Tag us on Facebook @wonderfil, instagram @wonderfilspecialtythreads, or using the hashtag #wonderfil. Happy crafting!
